Monday, October 21, 2013

Testing the Charcoal Stove!

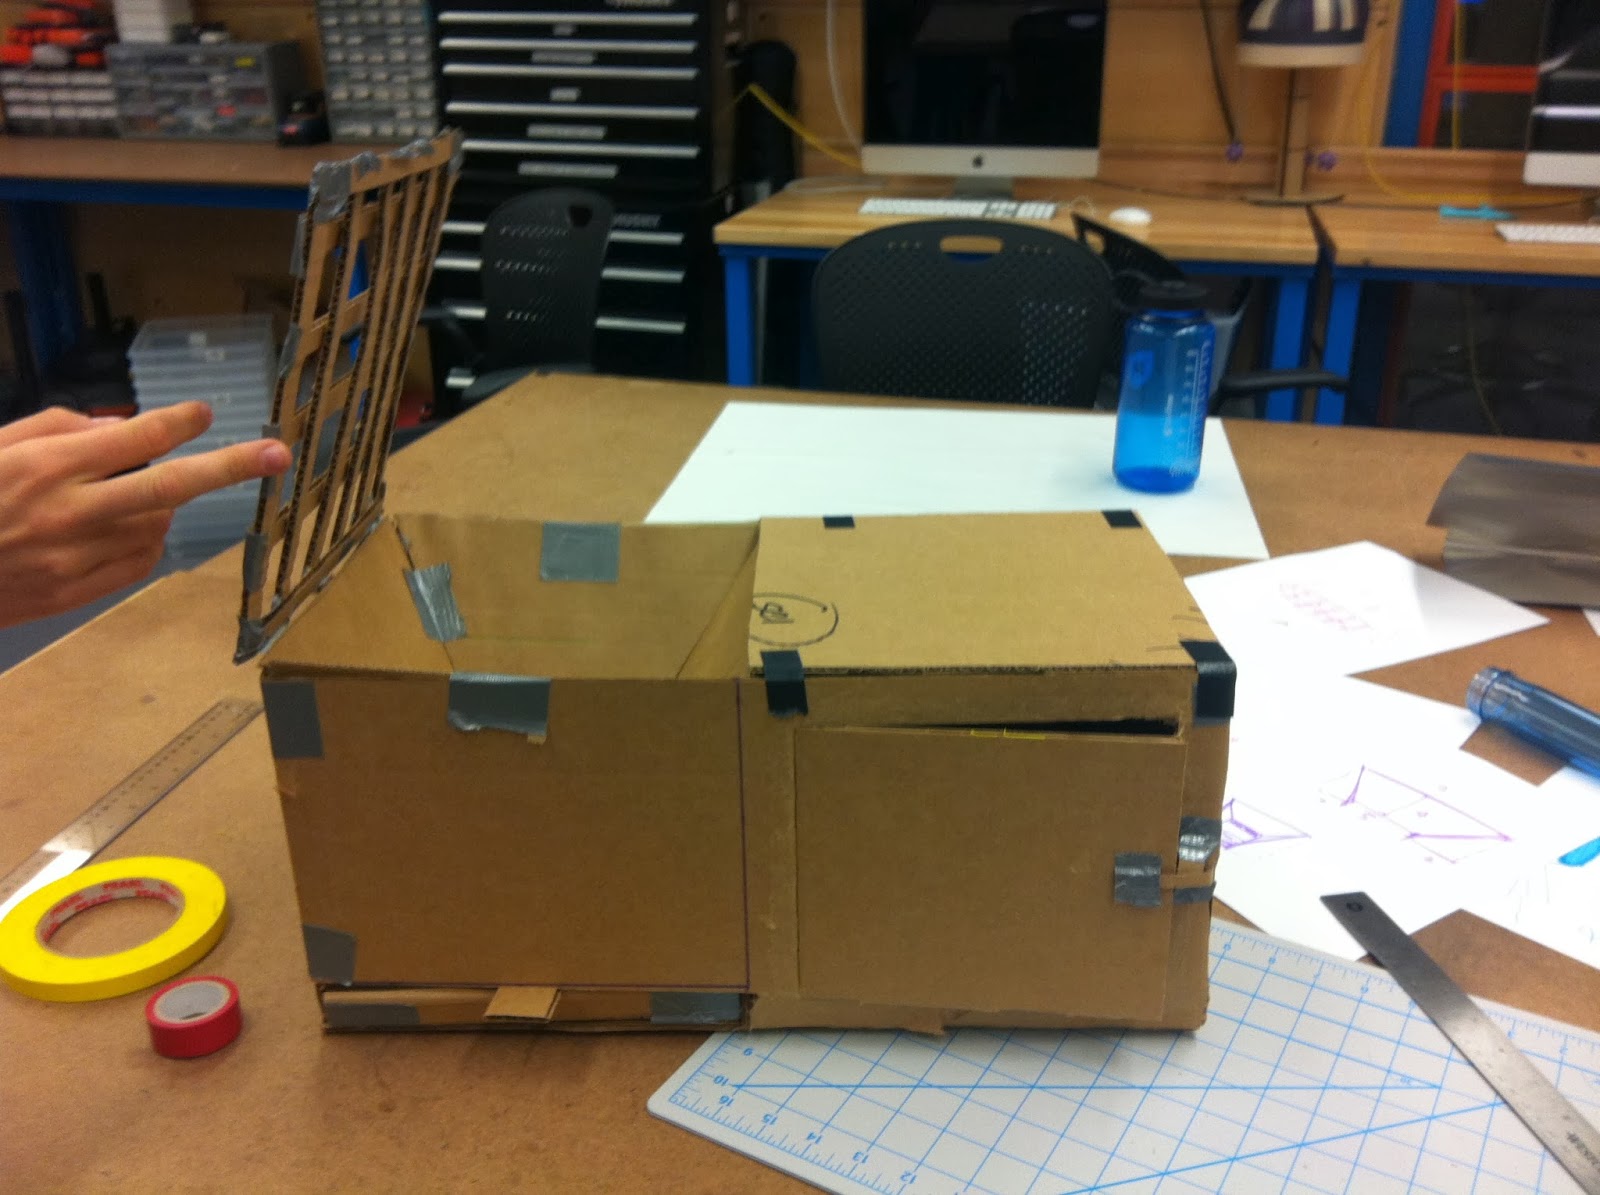
At long last, we had the opportunity to test our stove! Our goal was to boil 1000ml of water using 200g of charcoal.


Strengths of our stove:

- Our charcoal started burning pretty quickly and maintained a good flame.

- Charcoal ash fell through grate at the bottom of the charcoal holder successfully.

- Side wall vents did a good job of providing air flow to the fire. However, if we redesigned the stove we would add a sliding panel to have an adjustable vent cover to regulate air flow. 

- Oven and oven top were quite warm, but not really hot enough to cook anything. I'm still skeptical of whether the oven feature would be used whatsoever by people in developing countries, as most of the food cooked in Latin America and Africa is done on a stovetop. 

- Apart from the grate that the pot sat on, the stove was structurally strong and stable despite the wind.

Weaknesses:

- When the fire started, it was quite smoky and the smoke flew upward toward the pot instead of through the air vents. This was unsurprising because our air vents were located beneath the charcoal holder. If we redesigned this stove, we would build a small chimney to direct smoke out of the top, or position the vents at the same level as the charcoal.

- The biggest issue with our stove was that the radiator covering that the pot rested upon was not structurally sound. As the grate heated up, the metal began to bend, melt and break so much that we had to move the pot halfway onto the oven side of the stove for support. This reduced the temperature of the water because it was exposed to less direct heat. The grate was also lacking support from the walls that it rested on because we had mismeasured the wall heights and had to insert a makeshift piece of metal to close the gap. Using a stronger material for the grate and creating more structural support beneath the grate could help overcome this problem.


- The ash tray was too hot to touch. We could have put a non-metal handle on the drawer so that it could've been pulled out safely while the fire was burning.

Water temperature:


We recorded the water temperature every 7 minutes. The water temperature generally increased and then leveled off over time. The point at 13 minutes when the temperature went down was when the charcoal container gave out and some of the charcoal fell into the ash tray. If this hadn't happened, I think we would have been able to boil our water successfully.


I think that we could have increased the water temperature more quickly by reducing the distance between the charcoal and the pot by making our charcoal container slightly smaller. We also could have afforded to reduce the height of the stove in general, while also making the oven slightly narrower, in order to concentrate the heat better. 


Sunday, October 20, 2013

Building the Charcoal Stove

Constructing a charcoal stove out of sheet metal was an incredibly new experience for me, as I had never worked with metal before. Though my group had conceived of our prototype with cardboard and duct tape, building a stove out of sheet metal and rivets required a new mode of thinking and came with new challenges. Initially we began to build by focusing at one part at a time, but we very quickly learned that we needed to meticulously plan out each step of the process beforehand. For instance, if we bent our metal into a box before drilling the holes for the rivets, it would become very challenging to maneuver the drill in that space. 

Therefore, we planned out our tasks chronologically and drew diagrams of different parts: 


Cutting and shaping the sheet metal was tricky, although it was quite thin. We used a sheet metal shear for the major cuts, and olfa knives and tin snips for the smaller cuts. In order to bend the metal into parts with 90 degree angles, we used a metal press or weakened the metal with an olfa knife and then carefully bent it over a table ledge or a heavy square piece of metal.  


Since we obviously couldn't bind our stove together with duct tape in the final model, we used rivets - metal mechanical fasteners used in aviation - to connect our sheets of metal together. To join two pieces with a rivet we had to create tabs that would overlap with another sheet of metal. We also had to drill holes in the metal for the rivets.                                                                                                                                                             


One of the issues we encountered was how to attach our grates to the bottom and top of the charcoal container. Initially we attempted to wedge the bottom chicken wire grate between the walls of the container and secure it with rivets, but this distorted the form of the trapezoid too much, so we rebuilt our side wall pieces to have tabs on the bottom and riveted the chicken wire to the tabs.   

After making side wall pieces with tabs and rivet holes, we cut out an air vent and covered the gap with radiator covering so that someone wouldn't be able to stick a hand into the vent while cooking, and also so that there wouldn't be excessive air flow to the fire. While we initially wanted to create a cover that could slide over the vent partially to regulate air flow and thus alter the intensity of the fire, we were not able to figure out the logistics of this design given time constraints.


We bent our metal into a rectangle, added the sides, and then riveted it all together. Unfortunately we had the mishap of making the long sides of our stove an inch short on both sides, so our short sides were an inch too tall. We fudged the difference by adding a long strip of sheet metal to cover the gap on either side, but the structural integrity of our stove certainly suffered from this mistake.


We hinged a grate made of radiator covering to cover the charcoal holder and made a top for the oven. It was surprisingly challenging to line up all of the wholes needed to hinge the grate to the stove.


Finally, we attached the stove door with a hinge and created a simple latch with a hook and eye latch.


At long last, our shiny aluminum stove emerged from the ashes looking quite like the cardboard model we had created!


Saturday, October 19, 2013

Charcoal Stove Cardboard Prototype

Before constructing our prototype out of sheet metal, we built our charcoal stove out of cardboard, to gain a better understanding of whether our initial design ideas were structurally viable.

We created a rectangular box with a divider to separate the oven from the side 
that would hold the charcoal. 
We created two vents on the side walls of the charcoal compartment.
An ash tray with a pull-out tab was added to collect charcoal debris.

A trapezoidal container with a grate on the bottom will hold the charcoal 
and allow ash to fall through.

A door with a latch was added for access to the oven.

A charcoal grate on top of the charcoal holder will serve as the high-heat stovetop, 
while allowing easy access to the charcoal underneath. Although we initially wanted a circular removable
 grate so that there would be less space for smoke to escape, we couldn't find a way to execute this idea.

Our final cardboard product.

Charcoal Stove Design

After learning about the environmental, health, and economic concerns related to cooking with biomass fuel in developing countries, my teammates and I set out to design and build an "improved" charcoal stove for use in underserved communities.

Our primary design goals were to:

1. Improve insulation & smoke control
2. Low cost & local manufacture

Secondary design considerations included:

- Range of temperatures for cooking
- Air flow
- Portability
- Safety
- User friendliness
-Aesthetics
- Simplicity

When embarking on the brainstorming process, we had a simple iron charcoal stove from Ghana in front of us as a reference:


The key features of this stove are its trapezoid form to evenly direct heat to the cooking 
grate, and an opening beneath the charcoal grate for ash to fall through and also for ventilation.


We generated the following ideas:


Drawing inspiration from my old fashioned wood stove at home (rough sketch pictured above), we decided that a dual stove and oven function would allow for a greater range of temperatures for cooking while retaining as much of the heat produced as possible. Food requiring the highest heat could be placed on a burner directly above the fire source, while other items with lower heat requirements could be placed in the oven, or on the surface above the oven. We also decided to retain the trapezoid shape of the charcoal holder in the Ghanian stove. Our design included a sliding ash try that would sit beneath the charcoal and collect dust that fell through the crate for easy removal. To improve air flow to the fire, we decided to include two air vents on the lower side walls. We hoped that these vents would also channel smoke out of the bottom of the stove, rather than the top.

Rough sketch:


Side view of our double grate, charcoal-holding apparatus:


Wednesday, October 2, 2013

Personal Energy Consumption Estimates

From September 29th through October 1st I recorded my energy consumption from different activities, including using lights, charging my computer, and cooking. In recording my energy use, I did not include using the lights for less than 10 minutes, for instance while using the bathroom, because I discounted this data as "noise" that wouldn't severely effect my overall estimation.

Here are my calculations, by day.

Watt hour (Wh) = watts * hours

Sunday, September 29th

- In room: 60W*1 bulb*1 hr = 60Wh
- On boat: 60W*6 bulbs*1 hr = 360W/10 people = 36Wh
- In library: 60W*3 bulbs*2 hrs = 360W/2 people = 120Wh
- In room: 60W*3 bulbs*6 hrs = 1080 Wh
- 2 computer charges: 60W*3hrs*2 = 360Wh

Sunday Total: 1656Wh

Monday, September 30th

- In Sports Center: 100W*55 bulbs*1 hr = 5500W/25 people = 220Wh
- Class in science lab: 100W*4 barlights*6 rows*2.5 hrs = 6000W/15 people = 400Wh
- In kitchen: 100W*4 bulbs*2 hrs = 800Wh
- Meeting in science lab: 6000W (from above)*1 hr = 6000W/10 people = 600Wh
- In room: 60W*4 bulbs*4.5 hrs = 1080Wh
- 2 computer charges: 60W*3 hrs*2 = 360Wh
- Phone charge: 100V*0.2 A = 20W*3 = 60Wh

Monday Total: 3520Wh

Tuesday, October 1st

- In room: 60W*4 bulbs*3 hrs = 720Wh
- In kitchen: 100W*4 bulbs*1 hr= 400W/3 people = 133Wh
- In science classroom: 6000W*2 hrs = 12000W/10 people = 1200Wh
- In office: 60W*3 bulbs*1 hr = 180W/4 people = 45Wh
- In office: 60W*2 bulbs*1 hr = 180W/2 people = 60Wh
- In living room: 60W*6 bulbs*1 hr = 360W/8 people = 45Wh
- In room: 60W*4 bulbs*6 hrs = 1440W/2 people = 720Wh
- 2 computer charges: 60W*3 hrs*2 = 360Wh

Tuesday Total: 3283Wh

Three day kitchen estimates:

- 2 refrigerators: 600W*72 hrs = 43200W/8 people = 5400Wh
- Cooking with stovetop: 2000W*2 burners*3 hrs total = 12000W/8 people = 1500Wh
- Dishwasher: 1000W*6 washes*1.5 hours = 9000W/8 people = 1125Wh

Kitchen Total: 8025Wh

Three Day Total: 16484Wh or 16.484 kWh

Average energy use per day: 5.5 kWh

Source used: http://www.donrowe.com/inverters/usage_chart.html

I estimate that over three days I used about 16.5 kWh of electricity. This is definitely an underestimate because I didn't count the bulbs closely in every room I was in, or record the exact amount of time in each place. Since the weather was particularly excellent during these three days, I spent a lot of time outside, so I assume that my average daily energy consumption is actually higher. From doing this exercise I realized that my energy consumption is lower on the weekends, when I spend more time outside and less time in class. Also, I spend a lot of time with my friends in Scoop so my personal energy consumption is lower. Kitchen appliances, namely the refrigerators, stove, and dishwasher, consumed the greatest amount of energy by far. 

Monday, September 30, 2013

Everyday Technology Power Estimations

Here are my very rough estimations for the power usage of some common technologies: a light, TV, computer, car, motorcycle, refrigerator, oven, and radio. I didn't use internet so these estimations must be taken with a grain of salt!
 

Sunday, September 29, 2013

Sampurn(e)arth Reforming Waste Management in India

Indian cities generate a massive amount of waste, most of which is dumped onto the open ground. Mumbai alone produces more than 10,000 tons of waste per day. Besides being an environmental travesty, waste pickers scavenge through the debris, searching for useful materials that can be sold or repurposed.


Sampurn(e)arth, a social enterprise start-up, is working to change how waste is managed, or unmanaged, in Mumbai by sorting waste at its source and "decentralizing waste management." The company separates wet and dry waste, and then transforms the wet waste into cooking gas and organic fertilizer at a biogas plant. The dry waste is then recycled.

What I find most powerful about Sampurn(e)arth's project is that it has partnered with Stree Mukti Sanganatha (Women's Liberation Organization), which includes an organization of female waste pickers. These waste pickers are trained to sort the waste and operate the biogas and composting systems. The benefits to these women appear to be manyfold - the organization pays them a living wage, social insurance, safe working conditions, and a livelihood that is not only dignified and empowering, but also improves the urban environment.

To read more click here. Visit Sampurn(e)arth's website here.